
Mardi Himal is a great trek if you are in Nepal for only a short time and want a maximum payoff. It is an easy to moderate hike that can be done quickly in 4 days (not recommended as it leaves no flexibility) or can be drawn out to 10 days (which many suggest would be a little too long if you are not choosing to do a few off-shoot trails.)
This trail can also be linked up with other hikes for a longer trekking experience such as Ghandruk (2-3 days) Poon Hill (5-6 days) or as part of the Annapurna Base Camp and Circuit treks.
My trekking partner and I decided to do five days, which we extended to 6 days when we got rained in at Low Camp, and we extended again to seven days, opting for an extra day at High Camp with the hopes of getting more desirable weather for our 4 AM climb to the viewpoint for sunrise and then to Mardi Himal Base Camp which is an hour’s walk beyond the viewpoint.

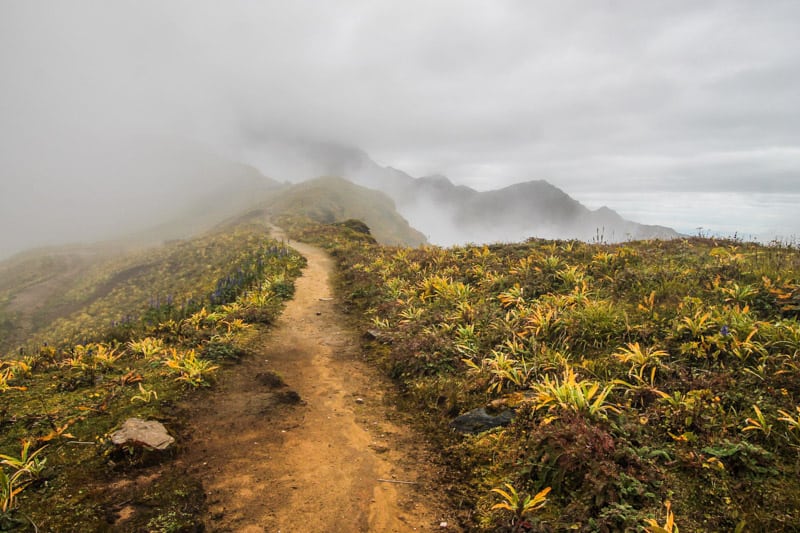
Fantastic view on the way to Mardi Himal Basecamp
This is the beauty of Mardi Himal, it offers a great amount of flexibility and is relatively new (opened in 2012), so it doesn’t have the same volume of people that Annapurna, Langtang and Everest Base Camp experiences.
It fits many time schedules, has relatively short hiking days with a moderate slope and plenty of time left in the day to relax at guesthouses or set up camp if you’re doing something more adventurous (see bottom for camping and gear).
The more you know about organizing your trek in advance, the smoother it is getting started. If you are going with a guide, they usually arrange your permits for you, and for those going independently, it is quite easy to do it yourself.
The most important preparation pieces are always the permits which require your traveller’s insurance (the policy number and other details – it is best to print off a copy and bring it with you to the permit office) as well as three passport photos (they will do this there, free of charge as part of your TIMS payment, but if you’re in a hurry, just bring your own) and finally, your passport.
The details below will help ensure a smoother trekking process for the entire Mardi Himal trek.
Make sure you have Nepali Rupees to pay the TIMS fees as they will only accept the local currency.
We left two days later than we originally intended and it was no trouble with the permits as they don’t hold you to a specific date.
It helps when they ask for dates to be general so you have wiggle room and it also allows for you to go get your permits in advance which is recommended, so everything is already in place by the time your desired departure date arrives.
Our Hike Synopsis for Mardi Himal.
NOTE: We didn’t really stop for breaks except if we took lunch at a guesthouse, so you may want to factor those into your time frame.
Day 1 – KANDE (1275m) to DEURALI (2100m) – 3 HRS hiking time

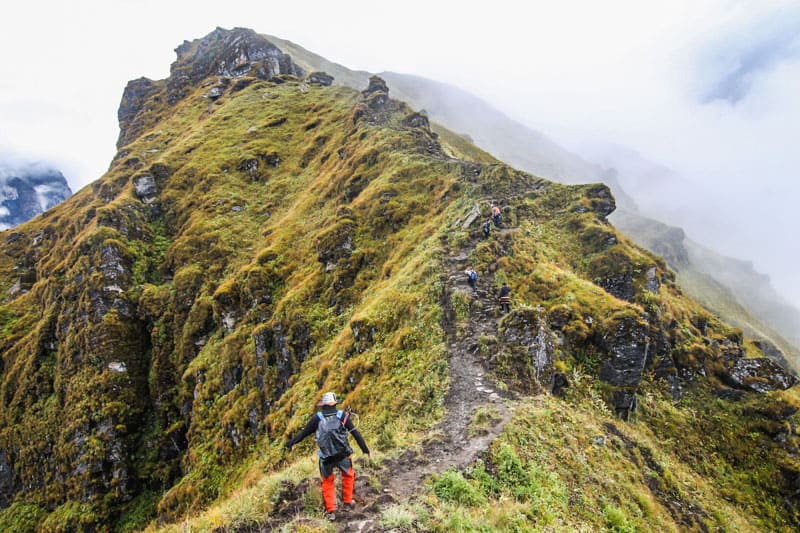
Stone Stairway to Australian Camp on the way to Mardi Himal
We reached Kande (1275m) by a muddied road that delayed our bus by 30 mins (which is relatively good) landing us at the start of the trail by 3:45 pm.
From Kande, we began our hike up to Australia Camp (2060 m). It was a fairly short one-hour hike with some steep sections.
We flashed our permits on our way to Deurali where we would stay for the night because we’d got such a late start (most people would start earlier and hike several hours past Deurali to Forest Camp.)
We arrived in Deurali by 6:00 pm. The muddied trail had us moving a bit slower in pace, but it was a relatively easy first day.
Day 2 – DEURALI (2100m) – LOW CAMP (2995m) – 5 HRS hiking time
We left Deurali at 9:30 pm into Rhododendron forest and maintained a steady incline, arriving for lunch at Forest Camp (2420m) at 12:45.
We took a long lunch to wait out the rain, leaving at 2 pm, continuing uphill and arriving at Low Camp (2995m) an hour and a half later.

View towards Pokhara on the way to Mardi Himal.
Day 3 – LOW CAMP (2995m) – Rained In.
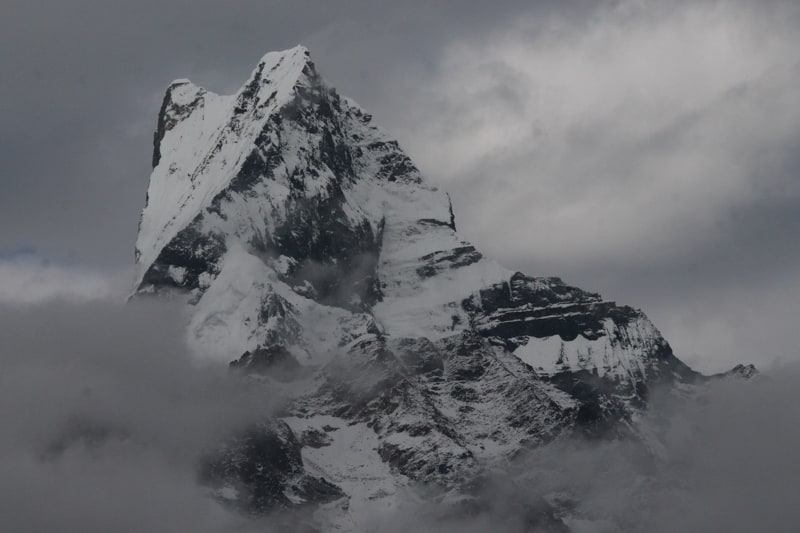
Machhapuchhare (zoom lens from Low Camp)
We didn’t get an early enough start to beat the torrential downpour that morning, and we ended up staying in Low Camp (2995m) as it poured the entire day and into the night.
Day 4 – LOW CAMP (2995m) – HIGH CAMP (3550m) – 3.5 HRS hiking time
We left by 5:45 in the morning into very muddy pathways heading up steeper inclines, arriving in High Camp (3550m) by 9:00 am.
We settled into our favourite guesthouse of the trek Hotel Fishtail. By evening we attempted a sunset hike to the viewpoint, but the white and blue trail indicators led us down the mountain towards Siding.
The new construction, the new route that was not on the map and the trail flag indicators had us confused.
A newly built guesthouse that we went around led us astray – you have to cut between two guesthouses for a clear trail up to the viewpoint. I suggest scoping it out during daylight hours, so you know exactly where to go in the dark if you are doing the early morning sunrise hike.
We didn’t make it to viewpoint as we wore ourselves out getting lost, but we knew exactly where to go for the next morning.
Day 5 – HIGH CAMP (3550m) – VIEWPOINT + Mardi Himal Basecamp (4500m) – HIGH CAMP (3550m) – 3.5 HRS hiking time
We left at 3:15 AM as we weren’t exactly sure how long it would take. It was a steep hour-long climb up (most people said it took them 1.5 hours total, and a few arrived after 2.5 hours stopping for lots of break in the steeper sections).
It is by far the most difficult terrain and slope of the trek, but worth the effort. We arrived at the viewpoint at 4:20 and had a long cold wait ahead of us, but we were invited into a little hut where the owner stoked the fire, and we paid for tea.
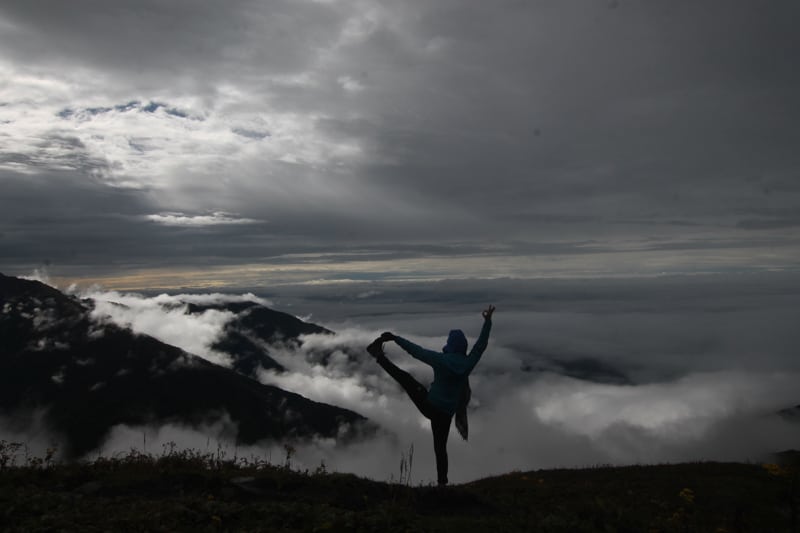
doing yoga on the Mardi Himal trek
By 5 and 6, several others joined us at the viewpoint, and for a few hours, we all remained huddled inside as it was too foggy for views. By about 9 AM the valley bottom cleared and then covered over again, we never saw Fishtail.
We headed to Mardi Himal Base Camp (4500m) which was an hour’s hike along rolling terrain, gaining the last bit of elevation on the hike.
Unfortunately, we were no luckier with our views there than at the viewpoint, but we enjoyed the hike.
When we arrived back at High Camp, we decided we would stay another night and try for better views at the viewpoint again the next morning.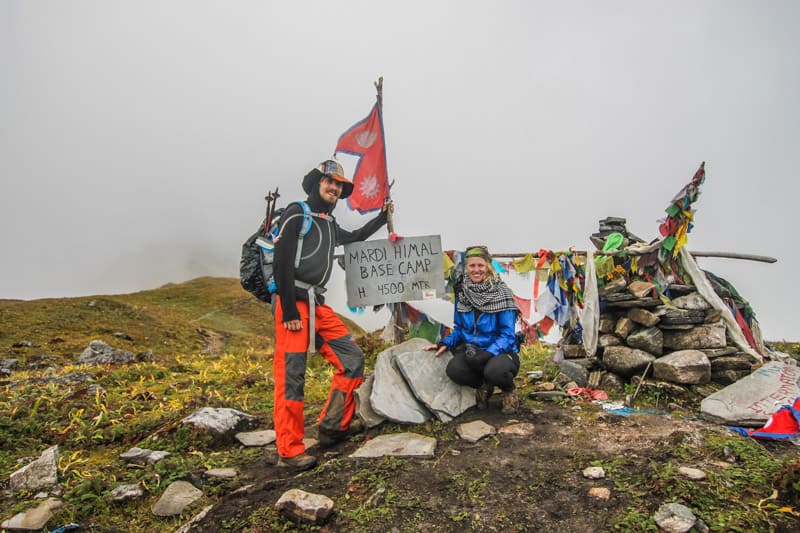


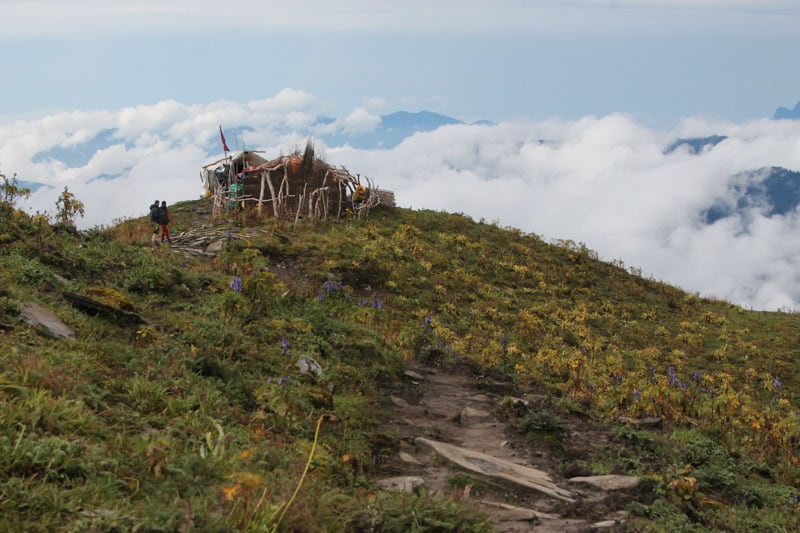
Tea house on the way to Mardi Himal base camp.
Day 6 – HIGH CAMP (3550m) – VIEWPOINT (4500m) – SIDING (1280m) – 2.5 + 7 HRS (9.5 HRS)
This time we slept an hour later, departing at 4:15 AM after a night of torrential downpour. It made the trail a bit muddy, and we were relieved the reach the viewpoint at 5:35.Home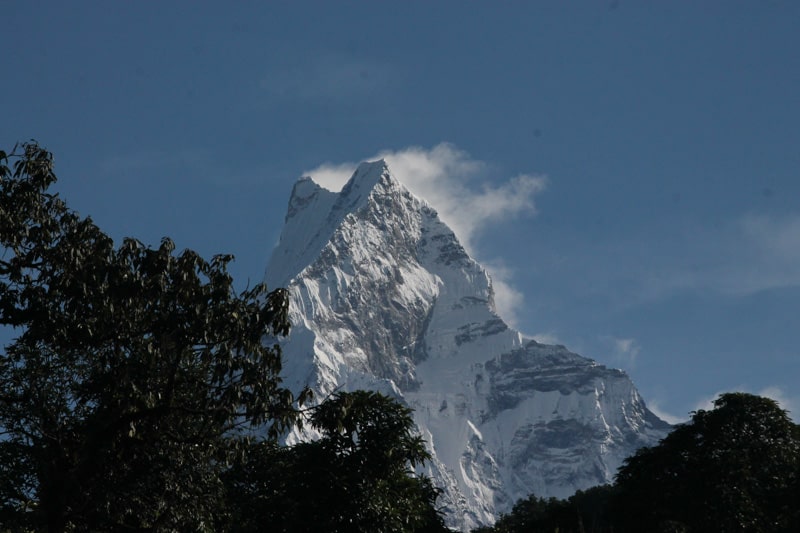
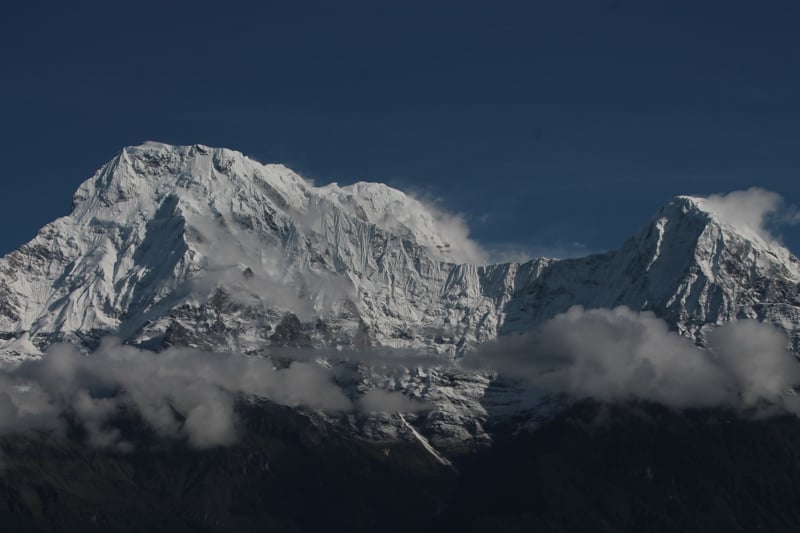
The valley was tucked under a veil of puffy white clouds but within an hour views of the surrounding mountains opened up in their own time to reveal Annapurna South, Annapurna Circuit Trail and finally Machhapuchhre (the iconic “Fishtail”).
Taking our time to get back down, we took brunch at High Camo before testing out the brand-new trail to Siding (1280m). It made for a long 7-hour hike down. The waterfalls along the way were absolutely stunning, but our knees were screaming by hour six, and the leeches were relentless.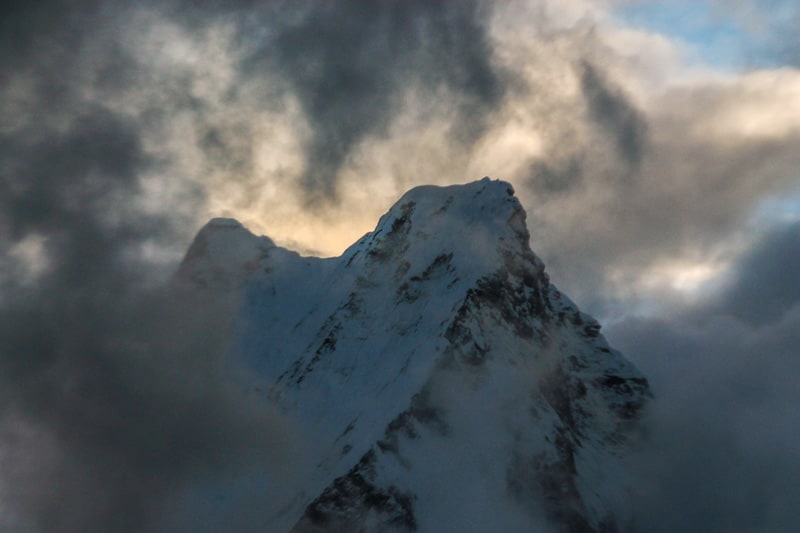
I pulled ten off me when we’d finally arrived at “Luxury Guesthouse” (don’t let the name fool you – luxurious it is not, but it was a roof over our heads after an exhausting and very wet day.)
Day 7 – SIDING (1280m) – LUMWRE (1250m) – POKHARA (1400m) – 3 HRS hiking time
We had a nice sleep in on our final day, and we were rained in for the following couple hours, and we left as soon as a window opened.
Our friends had a jeep to the next village of Lumwre as part of their guided package, but we and the other two at the guesthouse decided to walk the three hours.
It was a flat road and a relief for our knees after all the steep downhill of yesterday. It was a pleasant walk, and as we passed a couple of villages, we continued to ask around to ensure we were headed in the right directions.
We arrived in Lumwre by 2:00 and only had to wait 5 minutes for a bus that would take us back to Pokhara, though the fair was double what we paid on the ride out to Kande (300 NPR).
Despite all the rain and fog, we had a grand time, met some amazing people, and the glimpses of surrounding mountains peaks were made all the more special by their rare appearances in cloudy weather.
This trail has a very high payoff in a very short timeframe with as minimal effort as you can expect to put in when in the Himalayas. In other words, it is definitely worth it!
To Get A GUIDE OR NO GUIDE for Mardi Himal?
If you are considering whether or not to get a guide – don’t let others influence this decision for you as they are almost always making the recommendation based on their own bias and perspective rather than understanding yours.
Figure out what is important to you. Here are some common questions that traveller’s debate when deciding whether or not to get a guide that might help you decide what you want
Are the trails easy to navigate on your own?
Yes. Aside from a small issue, we had at high camp with a new trail that was just built but was not on the maps yet, (as of September 2019) the trails were very easy to navigate, and there was little confusion.
The trail up to Mardi Himal is well-marked with a blue and white square the entire way up.
Is Mardi Himal a crowded hike?
Yes. How many, will vary based on low high and shoulder seasons but you will meet other hikers regardless.
What navigational tools should I bring?
It is always a good idea to have your own map as the free ones don’t offer much in the way of detailed information.
Better in some ways than a physical map, (or in addition to) are apps like maps.me that allows you to download a map to any region before your trip so that you can access it from your phone without network or data (but beware of batteries draining – you can recharge your battery at High Camp, but it comes at a cost (costs will differ depending on season and increases each year.
I suggest bringing a jack or two to charge your phone along the way and turning your phone on airplane mode and low battery mode while hiking to preserve the battery).
You can bring a GPS if you are feeling really uncertain and need extra peace of mind as they can be an asset but is by no means a necessity for successful navigation.
How do I access food and water on the Mardi Himal Trek?
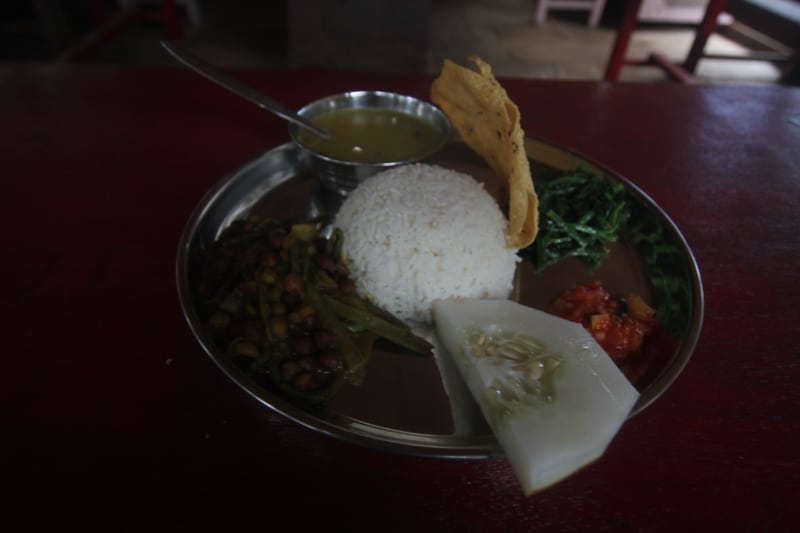
Dhaalbhat is most common food on the Mardi Himal Trek
The guesthouses provide meals – sometimes just daalbhat (rice, lentil puree, cooked vegetables,) but most have western food as well if you’re willing to pay a bit more. The guesthouses can provide water in the form of water bottles (this is not suggested due to plastic)
It promotes waste – there is no recycling program in Nepal which means that even if you bring your bottle down with you back to Pokhara, it will still become waste). The guesthouses will also fill up your water bottle/bag for you from their taps, and you can purchase cheap iodine tablets to clean the water.
There are also plenty of water bottles you can buy that have filters on them; I suggest purchasing one before arriving or picking one up in Kathmandu which has a much better selection of hiking gear than Pokhara.
Does going independently take away from the local economy on the Mardi Himal Trek?
If you ask a guiding company, they will say yes because it takes away from them directly but in the bigger picture, the economy itself, you are still purchasing your permits, and purchasing gear, food and accommodation along the Mardi Himal trek.
You can even hire a Porter without hiring a guide which will also increase how much you contribute to the economy. Where you save in one area, you spend in another for the most part, so it usually evens out.
A tea house vendor, for example, will lose out on your business if you make your own tea, but the store you bought your teabags from and the place you bought your stove and the gas to run the stove from, will benefit where they otherwise wouldn’t have.
There are a lot of different ways and varying degrees you can contribute to the local economy, and it all depends on how you want to invest your money in Nepal.
If you’ve found a guiding company wherein your money goes further to support empowerment and community outreach programs through their guides, then, by all means, get a guide from that company and support a good cause.
If you need peace of mind by hiring someone who has done the trail before, can navigate and negotiate the guests houses easily and whose company will take responsibility for your success and safety, then choose to take a guide.
If the value of your trip comes from self-sufficiency, isolation, and the authenticity of adventure then feel free to go without, there are many other ways to still support the economy in Nepal.
PERMITS For Mardi Himal
Essential Information
- Tourism Information Center is open from 10 AM – 5 PM
- Permit 1: TIMS – 2000 NPR ($18) —- Permit 2: ACAP – 3000 NPR ($27)
- Bring with you: 3 passport photos (or have them taken there), your passport, Travel Insurance Information or Photocopy
NOTE: Your TIMS card and permits only work as a one-time entry to the park which means that each time you exit the park and start a new trek, you have to get a new TIMS card and a new permit. Independent trekkers going without a guide will need to get a green TIMS card.
At the Tourism Information Center
First, you need to get your TIMS card in which they will give you a form to fill out (that will request travel insurance information), and they will use one of your two passport photos. Once you have your TIMS card, you can then move to the room next door where you will fill out the Annapurna Conservation Area Permit (ACAP), provide your passport and two passport photos, and you will walk out of there ready to start your trek.
Directions to the Tourism Information Center:
The permit building is 1.5 km from Lakeside. Walk past the police information centre towards the tourist bus station. From Pokhara Center, take a right just after the police station and head down that road taking your first left. A couple of minutes down that road, you will see the signs indicating the permits and immigration building. I came from the Juicery (about as far away as you can get in Lakeside and it was a 40-minute walk).
When to Get Permits:
DO NOT GO ON A SATURDAY. Saturday’s in Nepal are their day of rest and sometimes the office is open, and sometimes it isn’t, or sometimes the TIMS counter is open, and the other permit counter is not, so it is best to avoid Saturdays. Also, look up Nepali holidays in advance as there are many and they can mess up your permit plans.
September and October are particularly difficult months to navigate as there are many holidays and celebrations during those months. Ask around to the locals before walking all the way out there to find it closed. Try to get your permit in advance in case of any delays so that it does not affect your desired start date.
ROUTE OPTIONS for Mardi Himal.
Starting in Kande/finishing in Siding: This is the most common route and the route we took. It took us through Australian Camp to Deurali and up to Forest Camp. Kande to Landruk is a moderate 12 KM ascent, and you can continue from there to Forest Camp the next day. (We didn’t arrive in Kande until 3 PM, so we didn’t go further than Deurali which was a three-hour walk.) If you don’t plan on doing off-shoot hikes in the area, Siding is probably the best place to end your trek (or if you can make it past there to Lumwre, even better).
Starting in Landruk/finishing in Siding: This is the quickest choice if you are short on time, but many suggest taking an extra day for acclimatization at 3000m (best option – Low Camp). You need to take a bus or jeep to arrive in Landruk; you’re better off walking the extra 12 KM to Kande or taking a bus there directly.
Starting in Ghandruk/finishing in Kande: this is the detour route which exposes you to a little more of Mardi Himal without the jackhammer bumps of getting to the other trailheads. You can’t do this route in less than five days so plan accordingly.
Starting in Ghandruk/finishing in Siding: It is a bit of long and arduous day to get from Ghorepani to Forest Camp due to the long initial descent and a long ascent in the end. The road from Landruk is not worth taking even by jeep; you are better off to go to Tolka, the next village past Landruk, to catch the bus or to Siding/Lumwre.
GETTING To The start of Mardi Himal
Kande: (where we started our hike from) is an hour and thirty-minute bus ride – if it is rainy season expect delays and slow travel on the roads due to mud which can take an additional 4 hours. The fare on the way out for us was 150 NRP (but others paid up to 300 NPR ($3). Buses leave all day long both ways until 4 PM. Taxis can take you the bus terminal, or you can ask around and start your trek with a 20-30 minute walk (it took us 20 minutes from Malama Spa on the main road).
Landruk: during high season you can get a jeep or try for the few buses heading there and back. The buses leave from a separate station in Pokhara between 8 and 9 AM and a taxi can drop you there. The bus costs 500 NPR and a Jeep there costs between 1000-1200 ($10-12)
Siding: to get to and from Pokhara from here, you can only take a jeep, and the price depends on how many people and how hard you negotiate. It can cost anywhere from 800-1200 NPR per person ($8-11). We stayed the night in Siding and walked a couple of hours by flat road from Siding to the next village of Lumwre where we caught the bus (200-300 NPR) back to Pokhara. Buses don’t depart after 4 PM, so factor that into your hiking timeline.
What To Pack For the Mardi Himal Trek
It is rainy in shoulder season and chilly at night. You will want sleeping clothes separate from hiking clothes, so you always have something warm to change into. A basic packing list can be found below:
2 T-shirts/tanktops (breathable is best)
Two warm long-sleeve shirts (one for sleeping, one for hiking)
Two pair of hiking socks
One pair of compression socks (for inside hiking socks – they are also excellent at keeping leeches out)
One warm pair socks for the night
One rain jacket or poncho
One warm Jacket for night
2-3 Buffs to use as a scarf, eye cover, bandana, toque etc.
One pair of hiking pants (quick dry is best)
One pair Long Johns/sleeping pants
One pair of hiking boots
One pair flip flops
Basic Toiletries: toothbrush, toothpaste, hand sanitizer, IB profin etc.
Headlamp or flashlight (4 AM hike to viewpoint)
Blister Kit, knife, basic first aid kit etc.
Antibiotics (severe diarrhea or other emergencies)
Sleeping Bag
Backpack Rain Cover (try lining the inside of your backpack with a garbage bag)
Phone jack
Extra Camera batteries (in case of cold weather)
Saltwater in a spray bottle (to ward off leeches)
Snacks (nuts, chocolate, dried fruit etc.) – especially for the sunrise hike
Sunglasses
GENERAL COSTS for Mardi Himal trek
Without guide porter and water, for six nights, seven days, in the shoulder season, with a good negotiator, we paid $130 each during our trip, but you can expect to pay around $25/day (roughly 3000 NPR). Guides are an additional $25-30/day and porters $20/day. Breakfasts range around 300-500 NPR ($3-5). Lunch or dinner costs between 400-600NPR ($4-6). Tea ranges from 50-120 NPR ($0.50-$1) getting more expensive the higher up you trek. Drinking water ranges the same as tea.
FOOD + ACCOMMODATION on Mardi Himal trek
Guesthouse Stops: Australia Camp – Deurali Camp – Forest Camp – Rest Camp – Low Camp – Badal Danda – High Camp
Deurali: there are also places in Deurali if you get a late start to your day (we didn’t start hiking until 1 pm and stayed overnight in Deurali before setting out to Low Camp)
Forest Camp: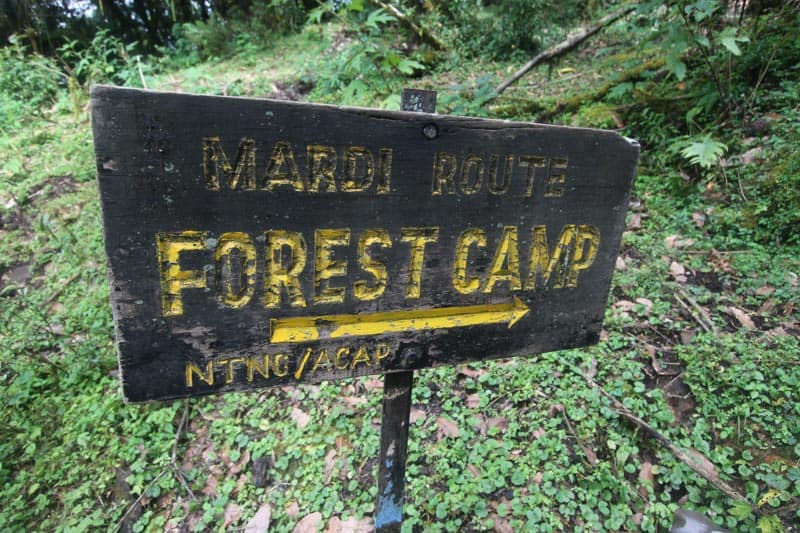
Hotel Forest Camp + Restaurant 9846619146
Hotel Mardi Himal+ Restaurant 9806536904, 9846802007
Low Camp:
Hotel Machhapuchre Samjhana + Restaurant 061-696875, 98560319903,9846418575, 9860504755
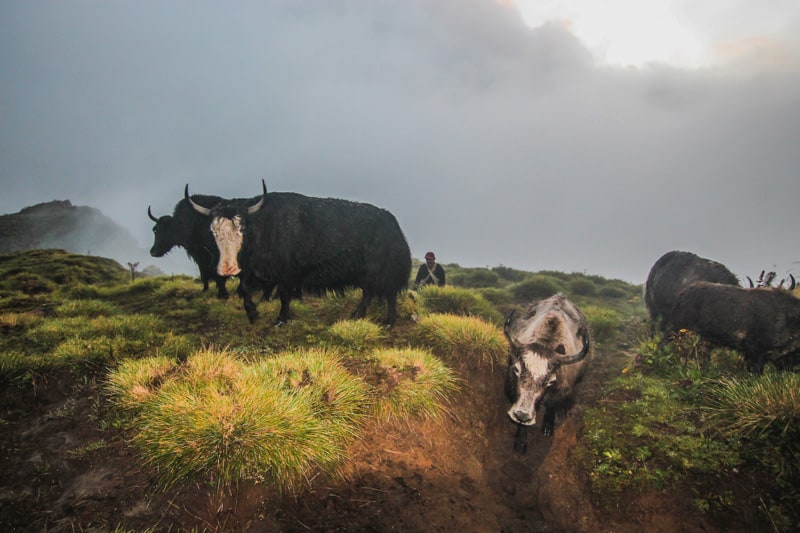
Yacks are common on the Mardi Himal trek
High Camp:
Hotel Fishtail + Restaurant – 061-620041, 9866061995, 9869143940, 9856075031
Hotel Trekker’s Paradise + Restaurant – 061-696668, 9856087625, 9846087625, 9846087624
Badal Danda:
Hotel Lucky View + Restaurant – 061-620041, 9866061995, 9814157732
Siding: (if you ask the owner of Hotel Fishtail at high camp, his brother has a guesthouse “Luxury Guesthouse” (do not expect any form of luxury) in Siding for the new route down to Lumwre where you can catch the bus back to Pokhara.
Unlike many hikes throughout Nepal that pass through villages along the way, Mardi Himal does not.
The guesthouses have been established specifically for this hike, and as a result of no surrounding villages, the trek does not have the groundwork necessary for amenities such as electricity, hot (gas) showers etc. in many of the guesthouses, so prepare accordingly.
If they do have this, you will have to pay extra (I bought a charged jack for my phone to charge it along the way). Bathrooms are either outhouses or squat toilets separate from your rooms.
The price of our guesthouses along the way depended on, the quality of the lodge we stayed in, the number of rooms available, how hard we bargained, how far along the trail we were and most especially, how many meals we would be purchasing from the lodge as food is the main source of income for locals.
Our accommodation was anywhere from free (so long as we each took two meals of daalbhat) to 600 rupees ($6) per night (the average cost is 400 NPR).
The rooms are basic, they can offer a bed and a blanket which will keep you warm enough to catch a bit of shut-eye, but it is much better to bring your own sleeping bag as the temperature drops at night and gets colder as you move higher.
They may be able to provide extra blankets if they are not full (if it is not high season. During high season (April and October), consider booking guesthouses in advance (3 days or so). We went in September and had no problems getting a room on arrival and others.
I’d talked to that had done the hike in other months also had no issues, but April and October can have you sleeping on the floor or an extra bench with little warmth and privacy if you get stuck last minute without vacancies.
Lastly, the guesthouses have two-bedrooms, three-bedrooms and four-bedrooms if you are going in a group.
You can inquire when you arrive. Our favourite lodge of the entire trip, partly due to its comfort and cleanliness and partly due to the kindness and authenticity of the owner, was Fishtail Lodge at high camp where we stayed two nights, but above are a few different lodges you can contact in advance if you need to.
Is Mardi Himal a safe trek?
Safety: The trail is fairly safe, and the lower altitude (… m) affects fewer people than other hikes in the Annapurna region. However, you should not rush the hike, and you should pay attention to how you feel as you gain elevation along the way as some people are more sensitive to altitude changes.
You can purchase Diamox in Pokhara, a pill that helps with altitude side-effects and bring it on the trail “just in case” but it is unlikely that you will feel any altitude effects. If you are going solo – let people both in Nepal and in your home country know that you are hiking and when you expect to be back (give or take a day).
Going beyond Mardi Himal base camp is a greater risk, and if you intend to, you should do the appropriate research and have the appropriate skill level to navigate it.
ADVENTURE GEAR for Mardi Himal.
Renting a tent is 500 Rupees/ day ($4.50 USD at the time of writing) from a company such as 3 Sisters Trekking (there are plenty of other trekking companies in Pokhara).
If you are interested in buying your own tent, there are very few shops that sell them in Pokhara so you may have to spend half a day popping in and out of shops to find someone who sells them – I bought mine in a small shop for 4500 ($40 USD).
It was a summer tent because that was all they had and it didn’t keep in heat well at night as a result which is not great for higher altitudes. Kathmandu has a better selection if you have it as an option or you can bring your own on your flight over.
Small stove heads cost about 800 Rupees ($7 USD), and large canisters of gas are 1000 ($9 USD) a piece or 500 ($4.50) for smaller canisters.
A “200 Set” of camping stove pots and pans is 500-800 rupees. If you buy more items together such as a foam mattress (100R – $0.80), a sleeping bag liner (800R – $7 USD), stove head, gas and pots you can negotiate a better price. Beware of buying sleeping bags in Nepal.
It is not the kind of item you want to find out is a knock off, and it is hard to test without the weather to expose its authenticity. There are legitimate outdoor stores in Kathamandu where you can purchase a warm sleeping bag if you need to.
If you do camp, be prepared to pay a fee of some kind to pitch your tent along the Mardi Himal trek.
NOTE: The camping option is best for people who enjoy camping, not just people looking to save some money and is even more suited to people going on multiple hikes where their equipment can be used again.
While I had the equipment to camp along Mardi Himal, I had a partner to share a room with (who was a great negotiator), and it was a very rainy September in 2019, in which I decided to scrap the camping plan as comfort and company was worth paying a bit more for in this particular adventure.
The price to camp is not much cheaper than a well-negotiated room. The only thing I would have done differently would be to bring my camping stove for tea as I drink tea a lot of it and it is more expensive up at the viewpoint lodges if you want multiple cups a day.
NOTE: It makes a big difference to the boys who run the little huts at the viewpoint to buy a cup of tea from them, they appreciate it, and the money goes a long way.)
The stove also comes in handy if you are looking to save more as you could pack chow-chow noodles for a couple of extra dinners but is not advised if you are staying in a guesthouse as often your negotiated guesthouse prices and the deal they will give you has much to do with what meals you will purchase from them during your stay and how many of meals you stay for. (See cost/prices)
Like it? Share it! Pin it!

Complete hiking guide to Mardi Himal in Nepal and the Himalayas