
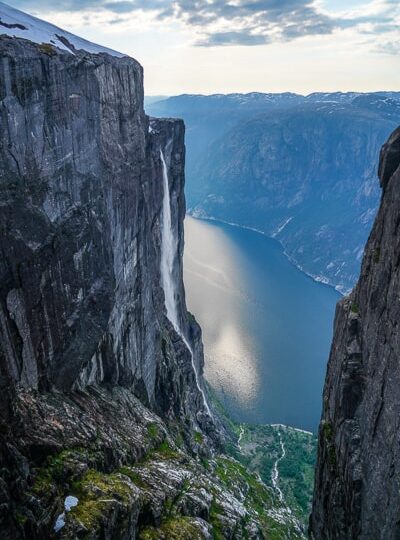
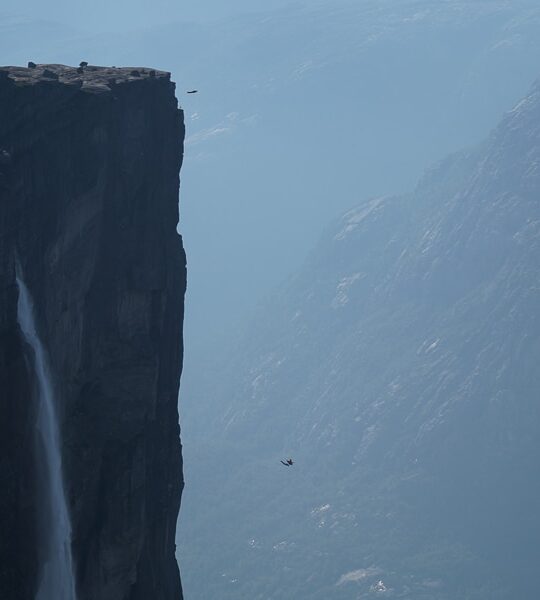
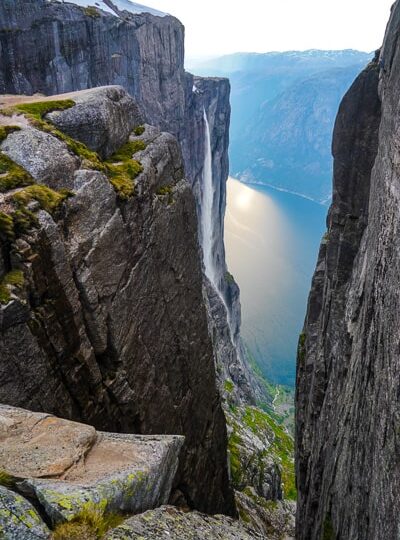
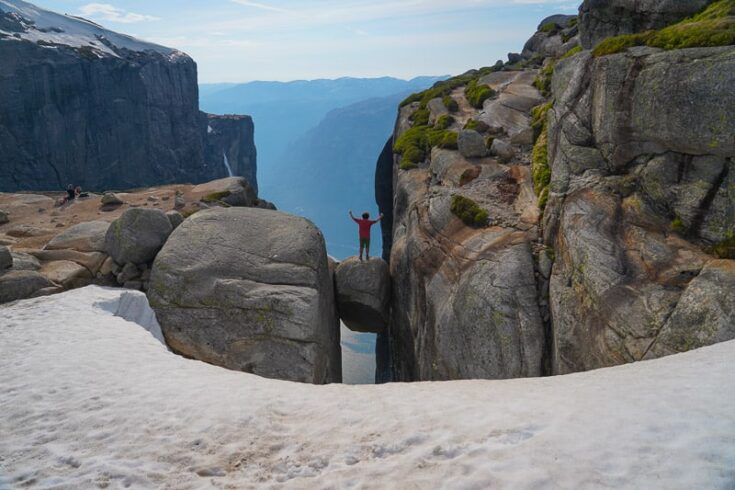
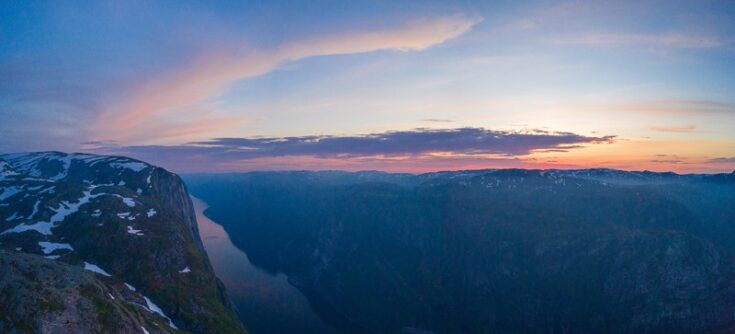
High above Lysefjorden, the same fjord which Preikestolen overlooks is a giant boulder called Kjeragbolten. This magnificent rock is wedged in a mountain crevasse 959m (3,156 feet) above the fjord.
Kjeragbolten, together with Preikestolen (Pulpit Rock) and Trolltunga, is one of the three most famous natural landmarks in Norway and one of the most popular hikes in the whole country – both for Norwegians and foreign tourists.
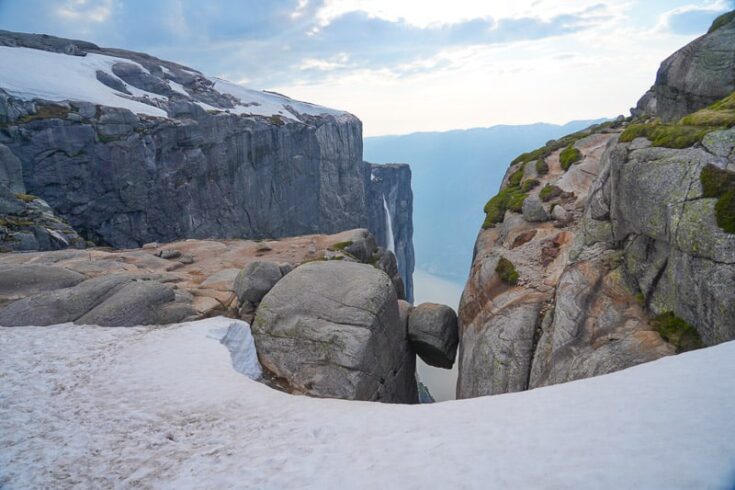
Every year, many people flock to take their turn standing on this death-defying boulder. Although it might seem crazy, Kjeragbolten is completely safe and there have been no tragedies so far.
If you’re a lover of heights and stunning mountain views, then Kjeragbolten should be on your bucket list.
Where is Kjeragbolten?
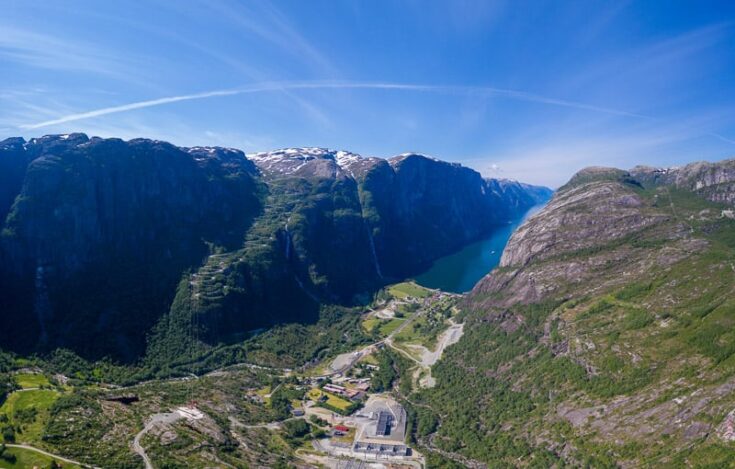
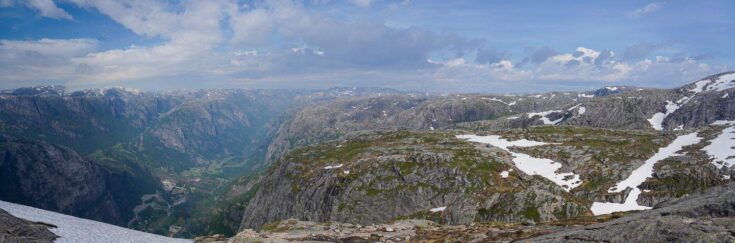
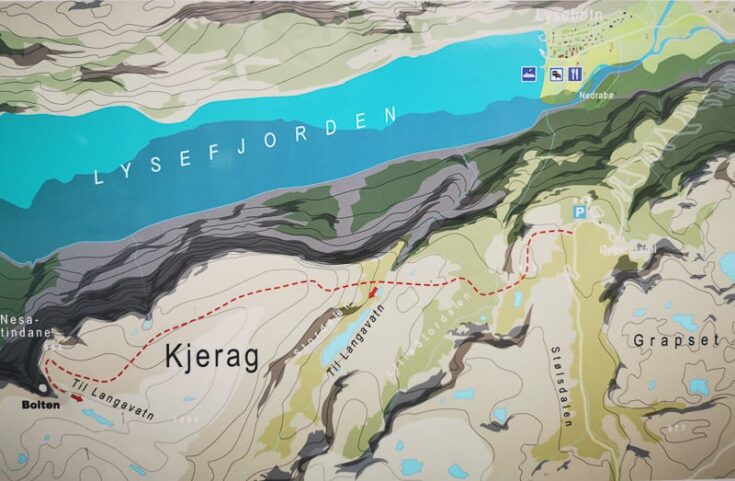
Kjeragbolten is found in the Kjerag mountain plateau which runs along the 42km (26 miles) southern side of Lysefjorden.
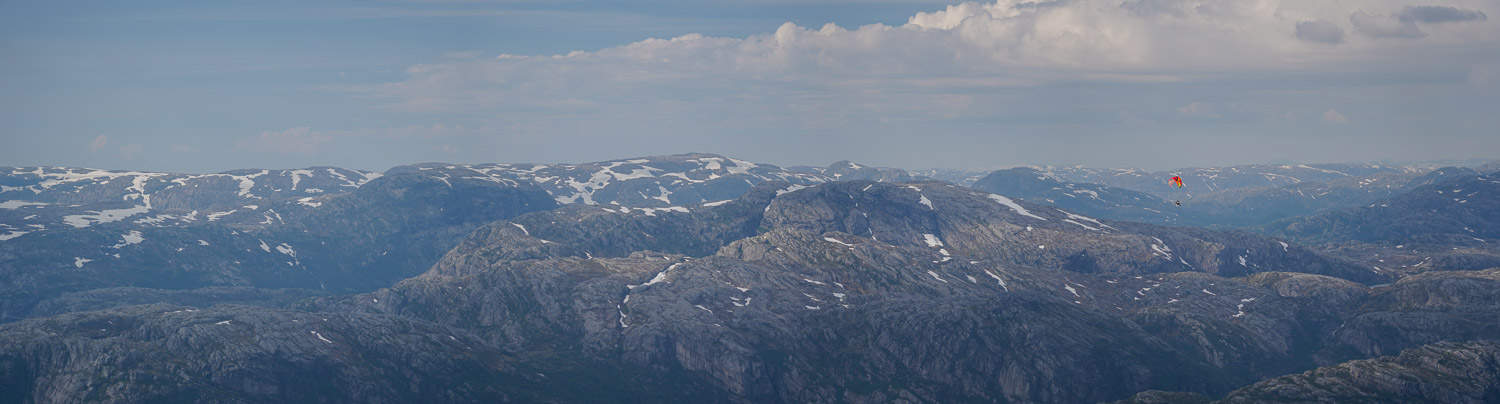
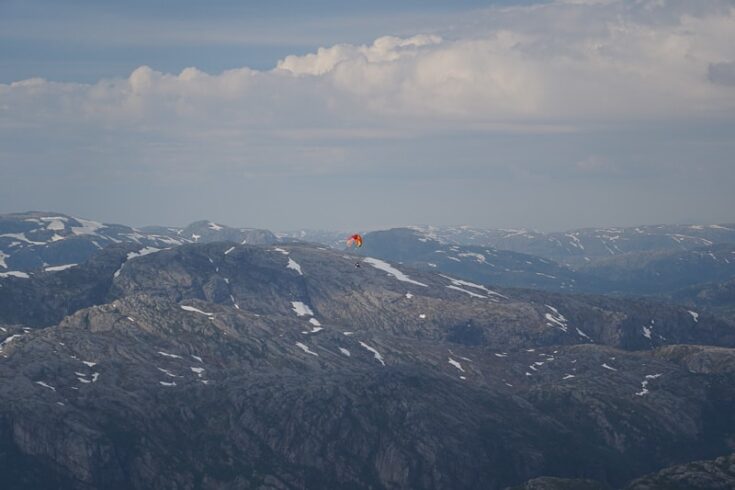
It is a world-famous destination not only because of this unique boulder, but also for Base Jumpers who come in drones to jump off the steep cliffs.

Hiking to Kjeragbolten is a must-do for all nature lovers visiting Norway and can easily be combined with a trip to Preikestolen.
If you have your own car you can enjoy both popular tourist destinations in one day, but if you’re relying on public transportation it will be better to split it over two days.
This guide is written from when I did the hike in late June 2020, when there was still a lot of snow along the trail.
Depending on what time of year you visit, your experience with the weather can be significantly different.
Kjeragbolten Hike
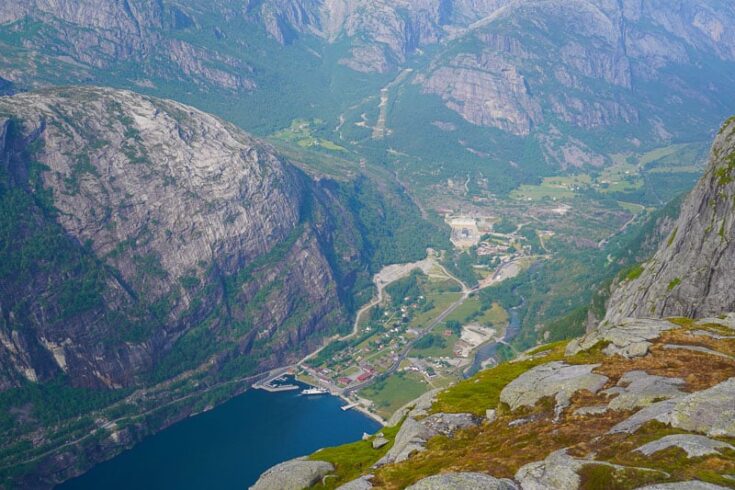
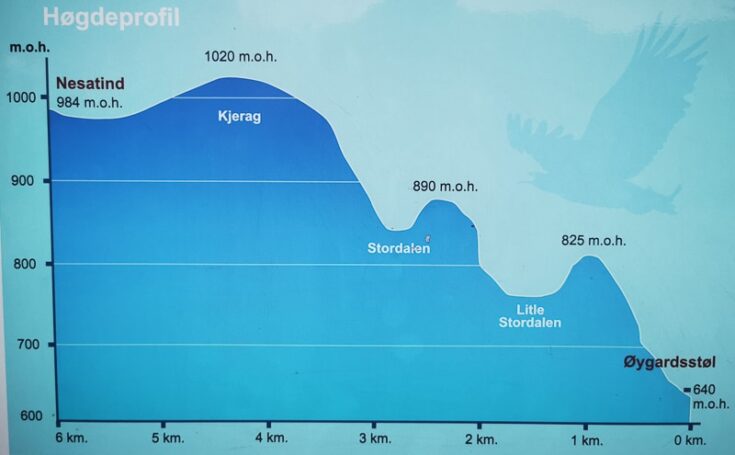
The hike to Kjeragbolten starts from the parking lot at Øygardstøl, also known as the Ørneredet (The Eagle’s Nest), a restaurant nestled 640m above Lysebotn.
Øygardstøl is located at the top of Lysevegen – one of Norway’s steepest roads that has 27 hairpin bends, an attraction on its own.
Tip: This is probably the restaurant with the best panoramic view in the whole of Norway, a great place to stop for lunch or a coffee after you have finished your hike.
Lysevegen, one of Norway’s steepest roads with 27 hairpin bends on the way to Øygardstøl, which is located on top.

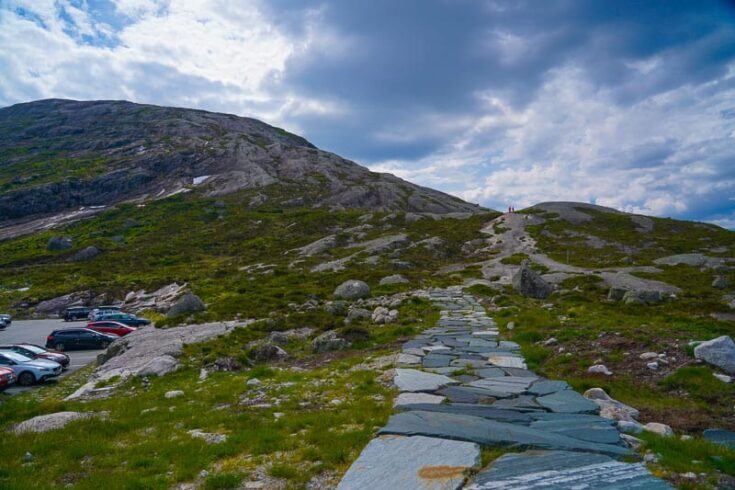
Starting Kjerag Hike, Norway
At the start of the hike, there are a few clean public toilets and a kiosk which rents out hiking shoes and trekking poles if you didn’t bring your own gear along. Be sure to use the toilets here if you have to as there are no toilets along the trail to Kjeragbolten.
Before you start the hike to Kjeragbolten, you should be aware that it is considered to be a Challenging hike, with some very steep parts. Although it might not be a walk in the park, the experience is definitely worth the effort.
Kjeragbolten is also considerably steeper than both the hike to Preikestolen and Trolltunga.
The hike starts immediately after you leave your car at the car park, and it’s straight upwards from the beginning – so much for a smooth start. Be prepared, because this is the first of three steep climbs on the trail.

It’s smart to start the hike at a slow pace, so that you don’t get burned out too early. There are not too many flat sections before you reach the end of the hike.
When you make it to the top of the first steep climb (which should take around 20 minutes if you are in decent shape), make sure to look back towards the car park and take in the magnificent view.

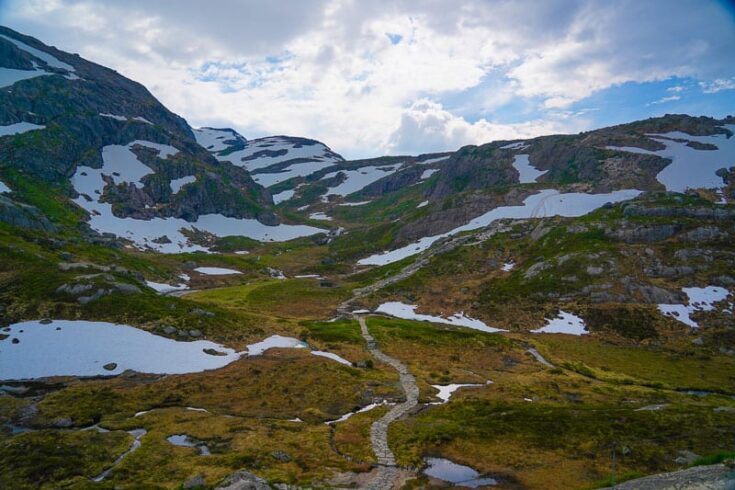
When you’re ready to continue, you can look out over the small valley you will have to cross. You can see the trail snaking its way up the mountain in the distance.
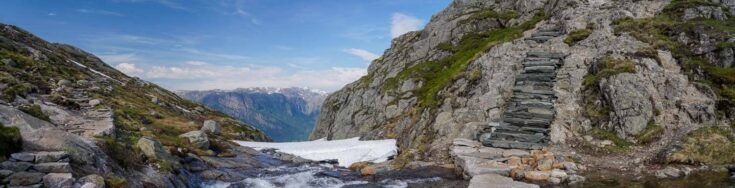
You will first have to climb down to the valley floor. Although the terrain can get very wet if it has been raining, there is a nicely made walkway that you can use to keep your shoes dry.
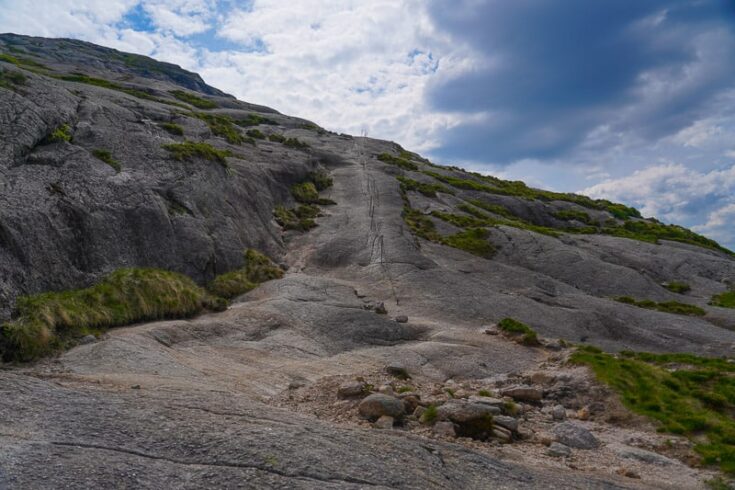
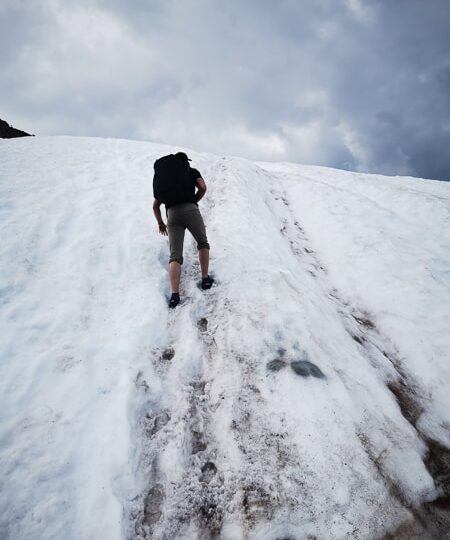
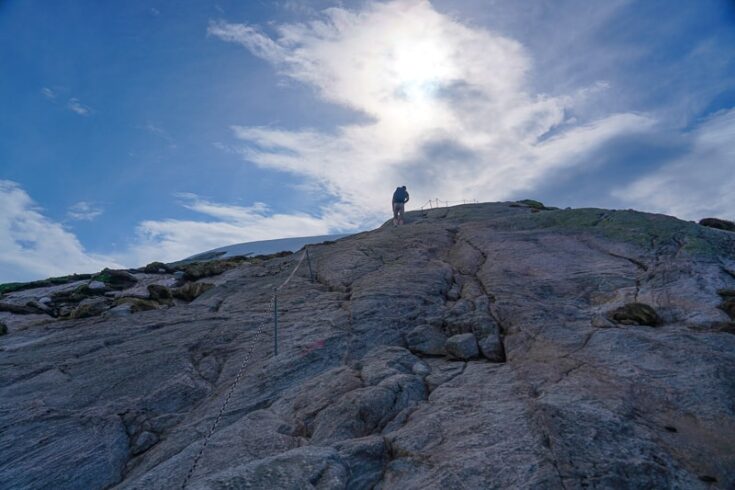
Once you reach the end of the Valley, you will have to start climbing once again. This ascent is not as long as the first climb, but some of the steepest parts of the whole trail are on this section – so make sure your legs are ready.

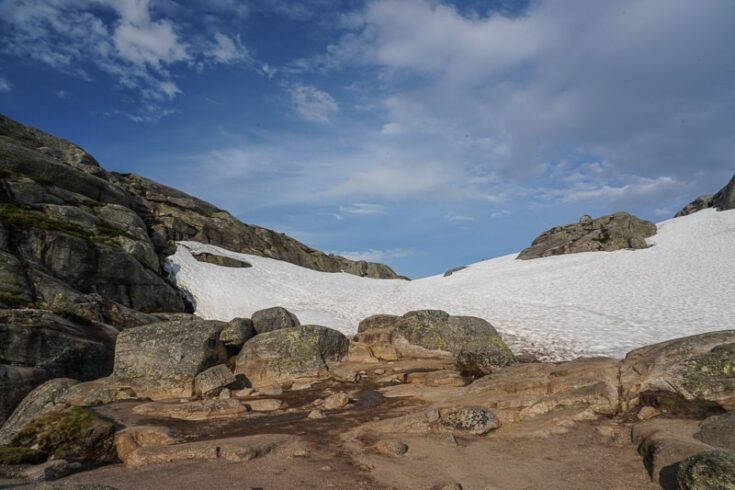
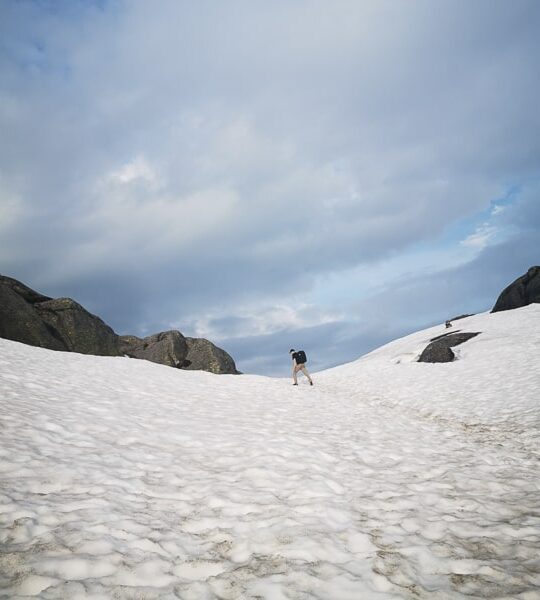
During my hike here in mid-June ,there were still some parts of the climb that were completely covered in snow, making it even harder to reach the top.
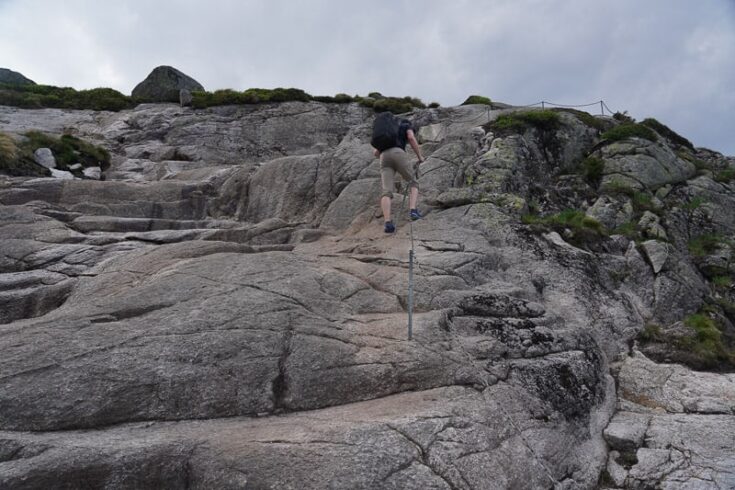
Be sure to hold on and pull yourself up with the chain railing that has been installed. It’s almost impossible to get up without the railing and you don’t want any unnecessary accidents.
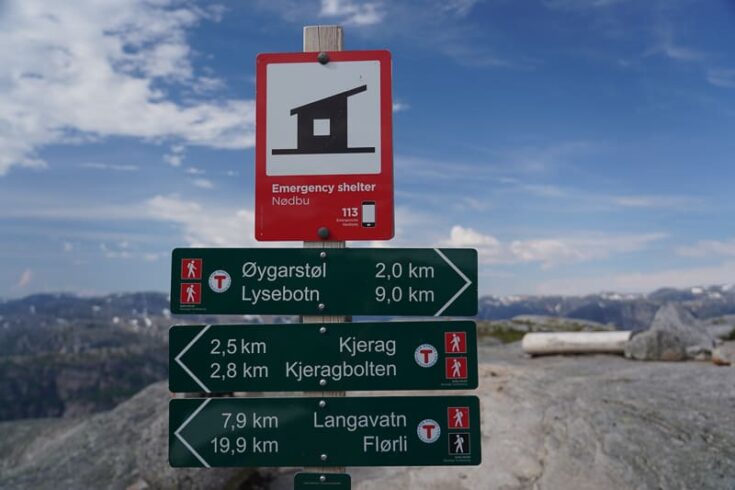
Once you are done with this climb, you will have time to rest at one of the only flat sections on the hike. This is also where the emergency hut is located. The shelter is locked, but if you encounter some nasty weather or get injured you can call the phone number on the cabin door to get the code.

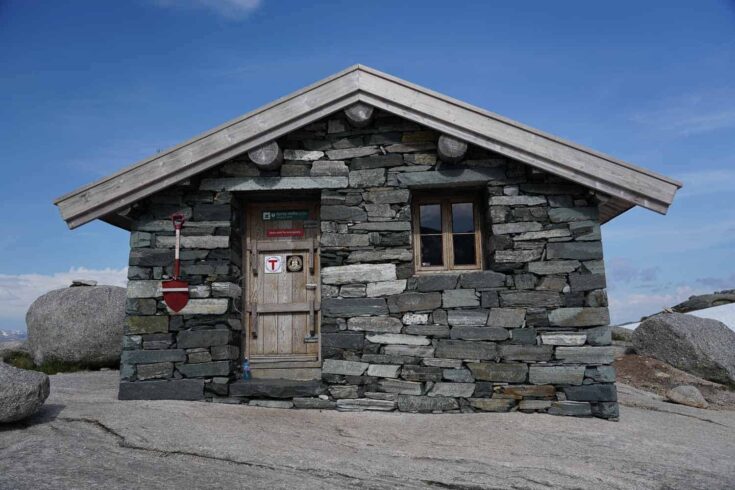
There are benches outside the cabin that you can rest at if you need to have a break.
After the cabin, the trail heads downhill for a bit towards a river. This is the last place you can refill your water bottle on the trail, so make sure to top up if needed.
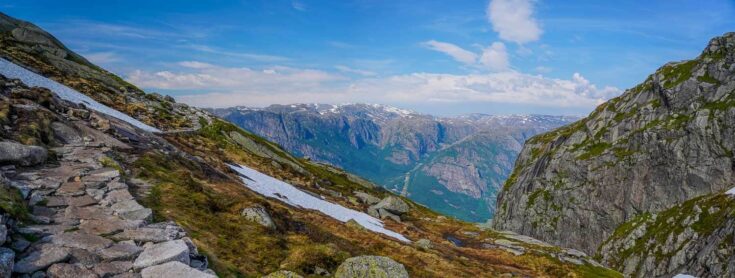
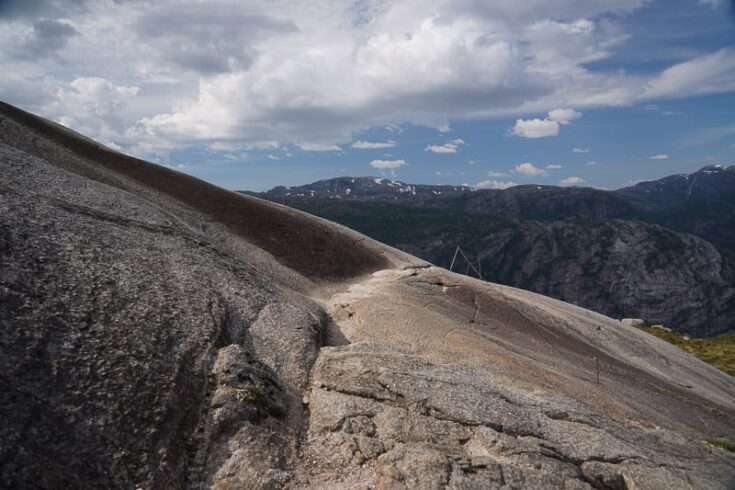
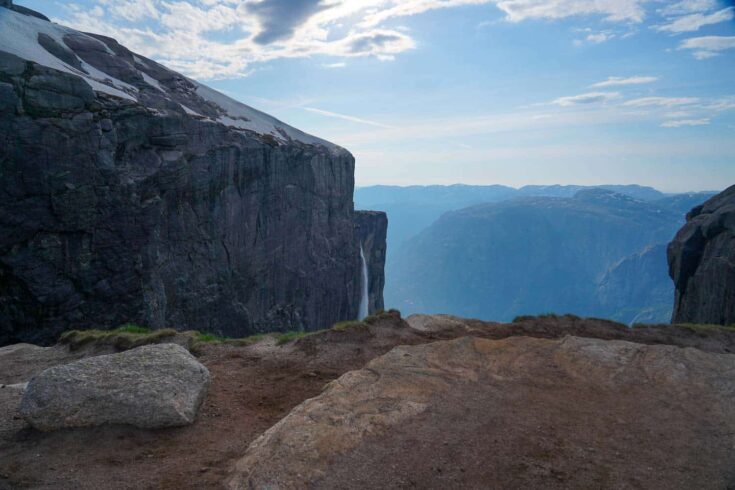
This is the 3rd climb, and I’m sorry to say it, but it’s also the hardest of them all. But at least when you reach the top, it’s almost completely flat all the way to Kjeragbolten.

Be sure to stop for a view back towards Lysebotn on this section as well. The view is breathtaking and you will be able to appreciate how high you have climbed.
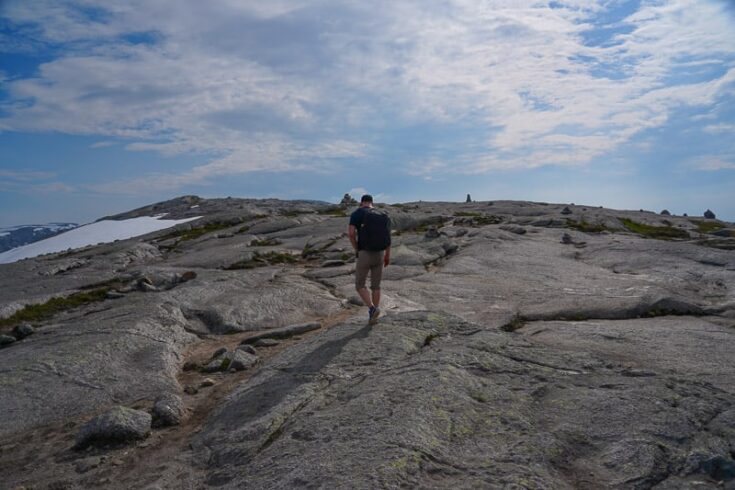
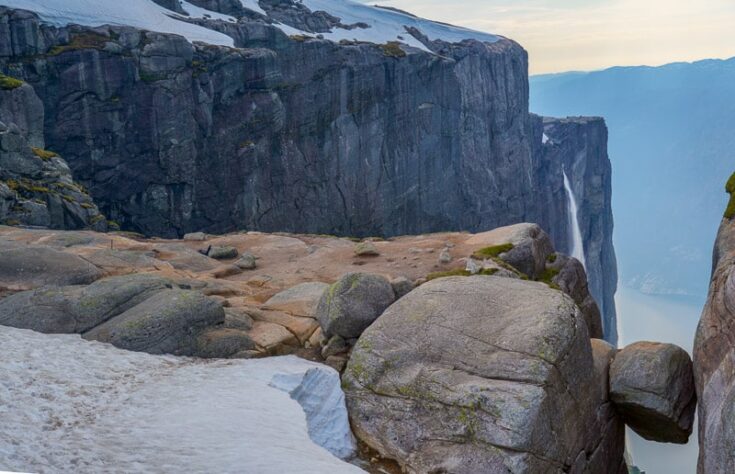
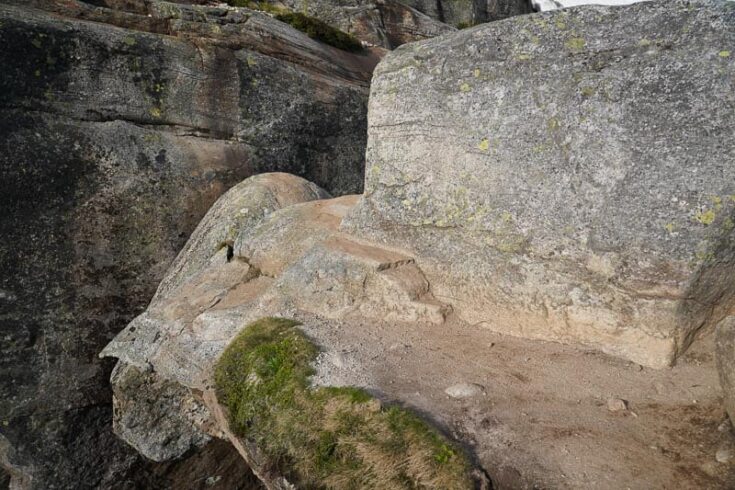
Once you reach the top of the last climb, you are finished with the hard part but you still have around 1km to walk.
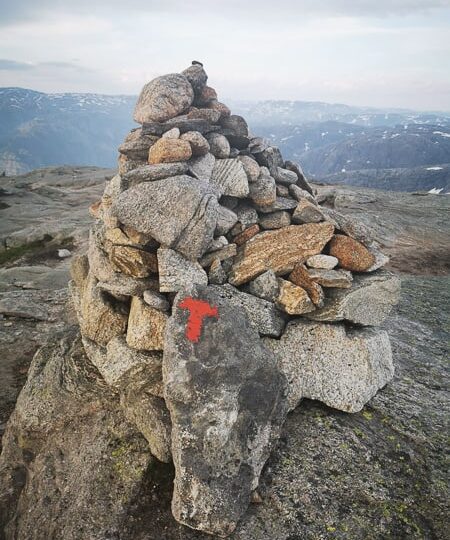
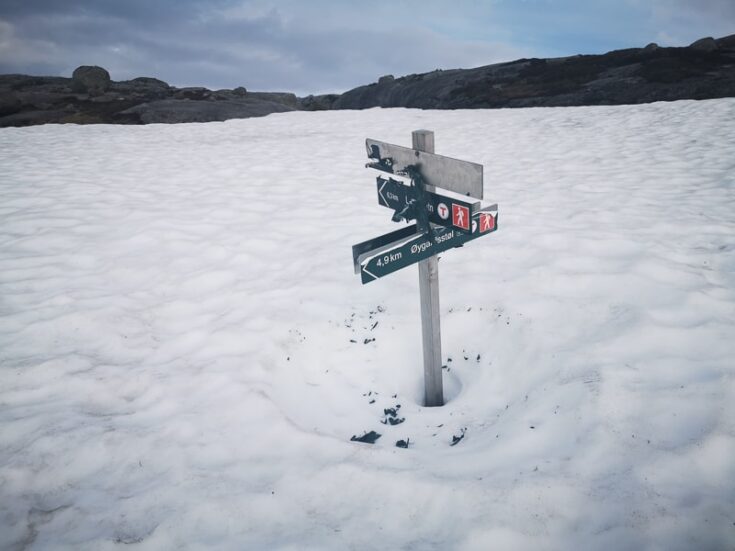
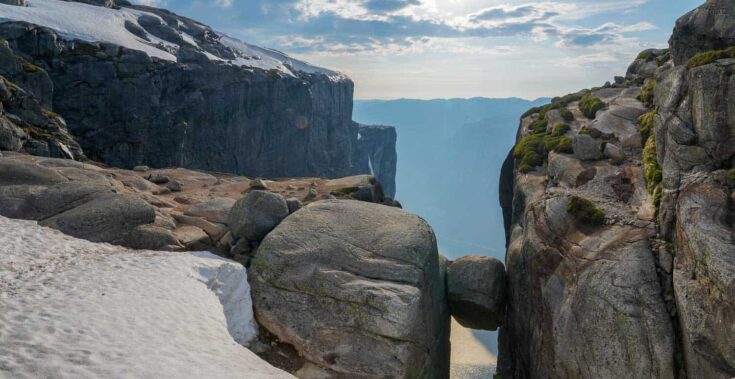
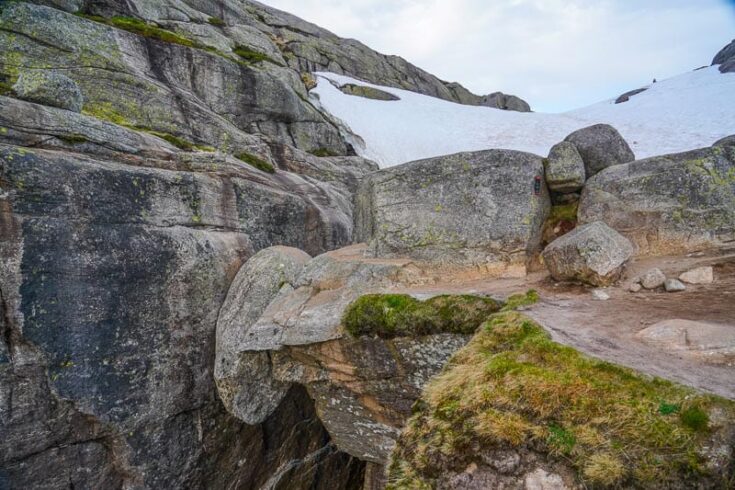
Be sure to follow the red “T” markings towards Kjeragbolten. It’s easy to get lost here in mist and fog that often accrue here.
A lot of hikers have built small cairns dotted all over the plateau, which is strongly discouraged by the Norwegian hiking association because it often confuses hikers.
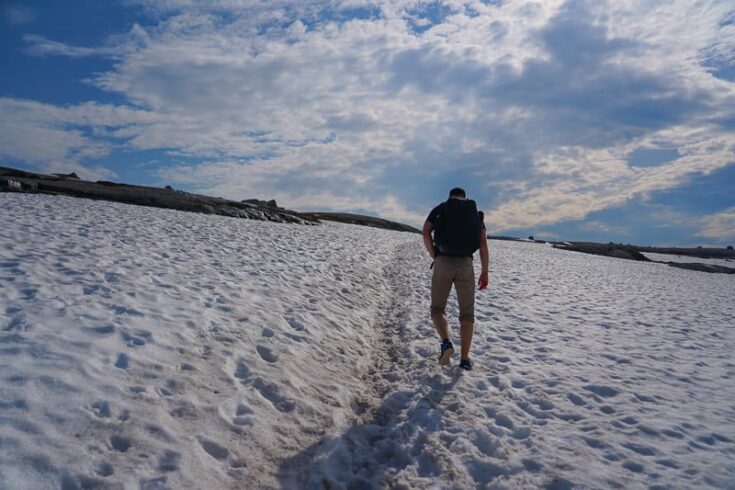
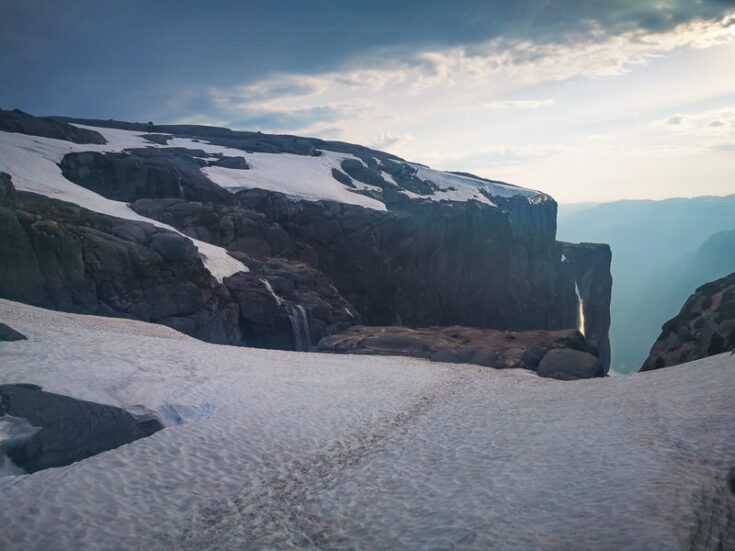
During my visit there was still a lot of snow on the last section when you go down towards the plateau. But since Norway closed its border in early 2020, I had the whole place to myself – a rare experience for sure.

When you reach the plateau, if you’re lucky, have a lookout for base jumpers jumping from the high cliff right across from where you are having a rest. Three base jumpers jumped while I was enjoying the view.
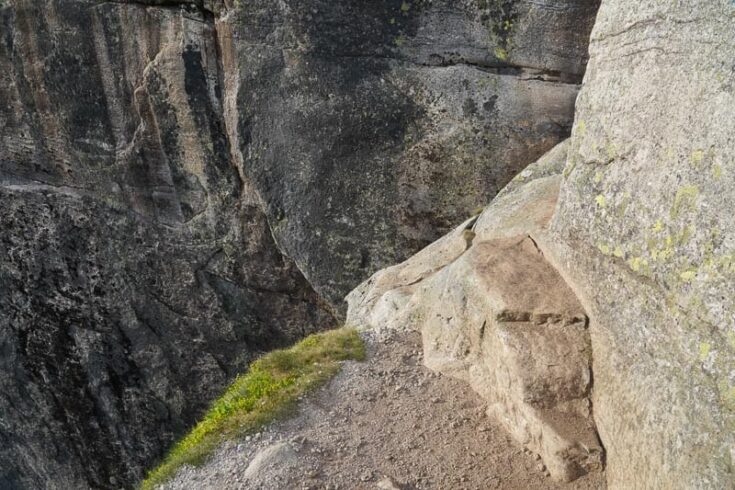
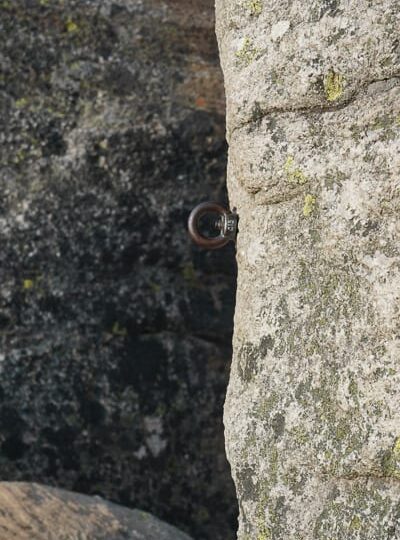
Getting on to Kjeragbolten
The scariest thing is not standing on Kjeragbolten itself, but the very narrow path that leads to it. Unless you’re an adrenaline junkie, this part is probably going to require a little bit of courage but you’re only a few small steps away from your goal.
And you only have a small metal knot to hold onto along the path. It’s much much scarier to do this than stepping out on the boulder.
Once you have finished enjoying Kjeragbolten and are ready to head back to your car, just take the same trail back to Øygardstøl.
Don’t underestimate the descent, people will often spend the same amount of time walking back down as hiking up. This is due to the descent being tougher on people’s knees than the ascent.
How to get to Kjeragbolten Norway
Kjeragbolten, Norway is located on the west coast, with the closest city being Stavanger (the fourth largest city in the country). It is easily reachable from all over Norway with domestic flights or via road.
Oslo to Kjeragbolten
From Oslo to Kjeragbolten is 363km (225 miles) along the E134 and E9, two beautiful roads which will take you past three of the famous Stavekirker In Norway – including the stunning Hedda Stav Kirke. The drive from Oslo to Lysebotn/Kjeragbolten takes around 6.5 hours.
It’s a beautiful drive with tons of places to stop along the way. So make sure to budget for some time to stop and take photos along the way.
Stavanger to Lysebotn/Kjeragbolten
By car: The best option is to drive south along the E39 before you take the RV 45 in Ålgård. Continue down Suleskarvegen and follow the sign for Lysebotn, which takes around 2 hours and 42 minutes.
By bus: In the summer season, Go Fjords offers return-trip tours to Kjearg from Stavanger for 629 kr per person.
By boat: In the summer, there are two types of ferries: the tourist ferry and the local ferry.
The boat only goes twice a day and it’s highly recommended to book in advance. But be aware that the ferry doesn’t leave from Stavanger itself but from Lauvvik – which is located 44km south of Stavanger.
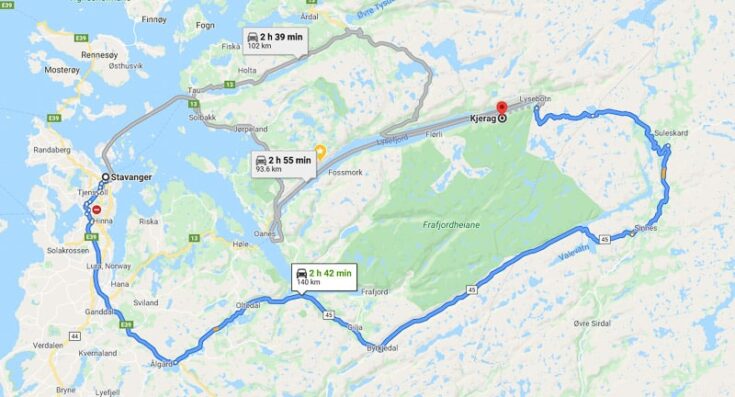
Closest Airport To Lysebotn/Kjeragbolten
Stavanger Airport Sola is the closest airport to Kjeragbolten, which is connected to all of Norway and has more than 20 daily flights from Oslo Airport Gardermoen. Stavanger Airport also has flights to most of Europe with the following airlines:
KLM (SkyTeam): Amsterdam.
SAS (Star Alliance): London, Manchester, Copenhagen, Stockholm.
Norwegian and WizzAir: Budget airlines like these two also have daily flights to Stavanger from all over Europe.
Shortcut to Kjeragbolten
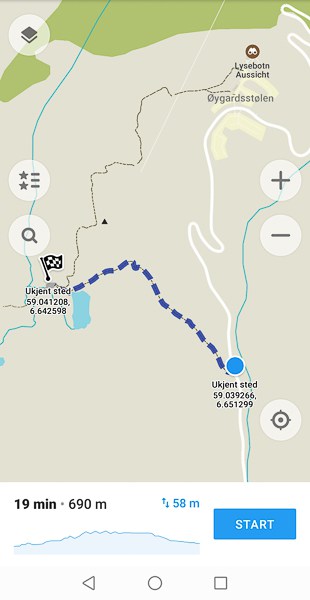
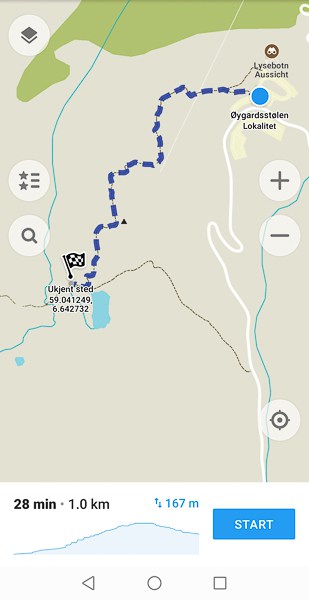
You’re not allowed to park there, but if you get someone to drop you off at the first car meeting spot (about 600 meters north of Øygardstøl) there is a trail which will bypass the first steep climb of the hike.
Tip: The shortcut is easily visible from the mobile phone app maps.me.
You will arrive at the first small lake where you will meet up with the original trail from Øygardstøl.
Facts about Kjeragbolten
Apart from knowing where the hike starts, there are a few things you should consider before starting the hike. These simple facts will help you plan the perfect trip.
Entrance fee to Kjeragbolten
Like every hike in Norway, Kjeragbolten is free. There is, however, a 300 NOK parking fee at the parking lot at Øygardstøl. The parking is valid for 24 hours from when you park your car, so it’s perfect if you decide to camp along the hike.
What to Pack for the Kjeragbolten Hike
Weather in this part of Norway is notorious for changing fast. You can start the hike in completely sunny weather and clear blue skies, but only after 5 minutes you could find yourself hiking in the rain. Because of this, you should pack for any weather conditions, rain, sun, or wind.
- Rain jacket – even if you start the hike in sunny weather.
- Solid hiking boots – the trail gets very slippery if it rains.
- Warm/windproof clothes – to change into if the weather turns for the worse.
- Food and beverages – there’s nothing to buy after you leave the parking lot.
What’s the Kjeragbolten Hike Distance?
The hike is about 10km (6.2 miles) long and 570 meters (1,870 ft) in altitude. This usually takes around 5 – 10 hours for a return journey, but the official time is 2.5 hours each way (excluding the time you spent at Kjeragbolten).
Personally, I spent 2 hours to reach Kjeragbolten and 1 hour 40 minutes to get back to the car.
At the peak, I spent around 1-hour taking photos and having lunch. But that speed is faster than most people, so rather plan extra time to be safe.
What’s the Best Season to Hike to Kjeragbolten?
The hiking season on Kjeragbolten depends on the snow, which is pretty short compared to other hikes in Norway. This is due to the winter closure of the highland access road to Lysebotn.

I was planning to hike to Kjeragbolten during my trip to Preikestolen in May, but the snow was still too deep, and the road to Lysebotn was still closed in mid-May, 2020.
So I had to come back a month later and do the hike in mid-June instead, and there was still snow along the trail.
The typical hiking season is June – September. But this can vary from year to year, and occasional snowdrifts should be expected all season.
The best place to check the current situation at Kjerag is at the Facebook group Kjerag Tourist Information which is updated almost daily.
Drone laws at Kjeragbolten
Drones are strictly forbidden over the whole of Kjerag, Norway, due to heavy helicopter traffic, base jumper activity, and being part of a nature reserve.
How big is the Kjeragbolten Boulder?
Kjeragbolten is a 5-cubic-metre (180 cu ft) boulder, which is more than big enough for you to comfortably stand on.
The drop is a direct 241-metre (791 ft) fall below and then another 735-metre (2,411 ft) gradient down to the Lysefjorden.
Kjeragbolten Deaths
Despite it seeming very dangerous, there hasn’t been a Krejagbolten death recorded due to someone falling from the rock.
There are, however, 11 Kjerag deaths of people who have died from Base Jumping, but none of those deaths have been from falling off this world-famous boulder.
Best Time to Visit Kjeragbolten Rock
Kjeragbolten rock is a unique tourist attraction that will get most hikers and adventure enthusiasts excited.
The hike might not be easy, with a very steep ascent, but the views that you will be rewarded with are well with the effort.
Along with the most beautiful valley in Norway and nearby Preikestolen, Kjeragbolten is another must-see Norwegian nature location.
Kjeragbolten: A Challenging But Memorable Hike in Norway - Life in Norway
Wednesday 14th of June 2023
[…] “When you reach the plateau, if you’re lucky, have a lookout for base jumpers jumping from the high cliff right across from where you are having a rest. Three base jumpers jumped while I was enjoying the view” – Unusual Traveler […]
Benjamin Ong
Monday 10th of April 2023
Hello from Malaysia! 😊 Thanks for this post and lovely photos. Will hope to do this place someday soon.
Sunny
Thursday 9th of June 2022
Amazing guide! Loved the photos of every single step. Now I don't have to do it. I am the reverse of what they call adrenaline junkie but this boulder is too interesting to not read about.
Sofie
Sunday 9th of January 2022
Hi Christian, what a good and clear article! Thank you. We would like to do the Kjeragbolten by the end of May. We are not experienced with walks in the mountains. Last year we did a few in Slovenia which were really terryfying for us. But we would like to try Kjerag anyway. The thing that reassured us, was that there would be chains all over the track. Is that right? That was often missing on the steeper parts in Slovenia ...
Thanks a lot! Regards Sharon & Sofie
Christian L.
Sunday 9th of January 2022
Hello Sofie.
The hike itself to Kjeragbolten is very easy but steep, and done by thousands of tourists a year, with all levels of experience. Yes, there are chains on all the steepest parts along the trail. So you will always have something to hold onto while going up and down, but there can be a line of people if there´s a lot of people the day you decide to do the hike, so it can sometimes be very busy to get to use the chains. But the hike it´s really nice and well worth it.